 Prostate Commander Prostate Commander
Prostate Commander is not yet another DICOM viewer but a specialised analysis tool: AI contouring, lesion suspicion from diffusion and ADC following PI-RADS 2.1 logic, multiplanar review, Word report with 3D and the MR/US fusion biopsy simulation – entirely locally on your own computer. The same images explain to the patient their problem and the biopsy and train colleagues who are learning prostate biopsies.
The software automates the time-consuming steps of prostate MRI evaluation – contouring, overlaying sequences, finding and documenting lesions – and presents every result as a verifiable, correctable proposal.
Born out of daily practice: as a radiologist performing MRI/ultrasound-fused prostate biopsies together with a urologist, I was confronted with examinations of very different origin and quality – the images as well as the accompanying reports. To speed up validation beforehand, to see quickly how a fusion biopsy can be planned most efficiently and safely, and to be able to explain the problem to the patient on their own images, I wrote this program.
Preparing MRI/ultrasound-fused biopsies, a second look at examinations brought along, follow-up assessment and prostate volume measurement – with a comprehensibly justified lesion suspicion – and the consultation with the patient on their own images.
Reads a DICOM examination (folder or ZIP), detects axial, sagittal and coronal T2 and all diffusion b-values by itself, contours the prostate with AI, computes ADC maps, aligns the diffusion to the T2 automatically, rates lesions with a relative bpMRI score, produces two Word reports and simulates the MR/US fusion biopsy with probe, needle guide and biopsy position.
Radiology: for everyone who reads prostate MRIs and wants to keep control of every contour and every lesion rating. Urology: for planning the fusion biopsy – and for showing the patient their prostate problem and the way the diagnostic biopsy is performed (see Urology & patient consultation). Training: for colleagues learning prostate biopsies – the simulation lets them rehearse probe handling, plane, access and biopsy without a patient.
Every contour remains a proposal – green (active) or red (inactive), adjustable slice by slice. Slices without a plausible segment are set inactive instead of forcing a wrong contour. Every lesion carries its justification with it: the image and the report state why it received its score.
The workflow is linear: load, contour, compute, review, report, simulate. Every step can be followed individually; the expandable details explain what happens.
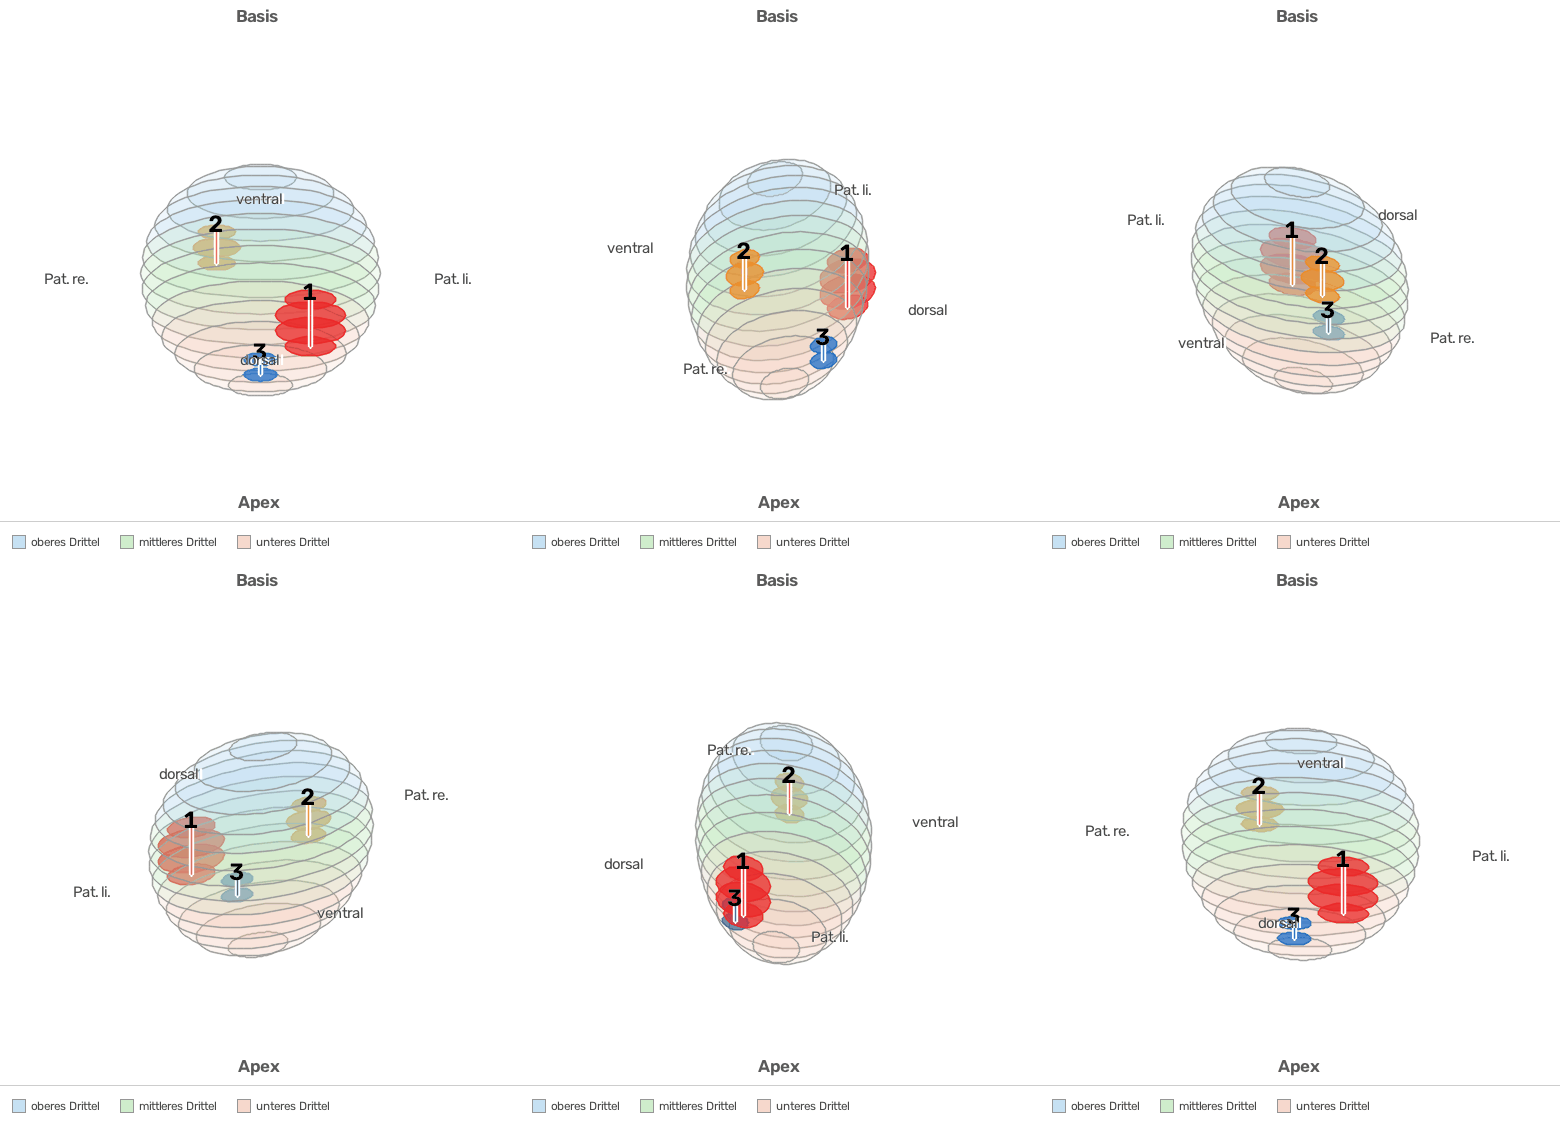
An MRI report is abstract for patients. Prostate Commander makes it tangible: their own prostate as a rotatable 3D rendering with the lesions found, the three image planes with the lesion at the same spot – and the simulation that shows how the diagnostic biopsy is performed with the ultrasound probe. This makes the application excellently suited for the consultation before a biopsy – and equally for training colleagues who are learning prostate biopsies: the same simulation can be rehearsed without a patient as often as needed.
The rotating 3D rendering from the report shows the patient's prostate with base, mid gland and apex, right and left, ventral and dorsal – and every lesion as a volume with rank number and score colour. Size, location and number of suspicious areas become understandable without jargon; the lesion report provides the same information in writing.
The fusion biopsy simulation shows what happens during the targeted biopsy: the transrectal probe at the prostate, the ultrasound image with the lesion, the needle guide, the needle path to the lesion and the virtual biopsy with the core cylinder – transrectal or transperineal. Patients see that the needle is guided precisely to the lesion, how deep and in which direction – and why the position on the examination table matters.
Radiology, urology and patient talk about the same image and the same lesion numbering. This eases informed consent, takes away uncertainty before the procedure and makes the decision between targeted and systematic sampling comprehensible.
The simulation runs entirely in the browser, without additional hardware – even without a fusion device the targeted biopsy becomes realistically plannable with a conventional ultrasound machine using insertion depth, rotation and needle path. For training: slide and rotate the probe as on the machine, choose plane and access, rehearse needle path and biopsy – with the probes of the common vendors, as often as needed, without a patient. An example with synthetic test data:
Start the fusion biopsy simulation
Schematic: probe position estimated from the contour, no tissue deformation, no image registration. An orientation and explanation aid, not a navigation system and not a medical device – indication, informed consent and performance of the biopsy remain medical tasks.
Compact and ordered by topic – the complete manual is built into the application.
Folder, single DICOM file or ZIP (nested as well) by drag & drop; automatic detection of axial/sagittal/coronal T2 and all diffusion b-values; vendor-independent; always just one examination.
prostate158 model for the whole prostate (one contour per slice); GPU (CUDA) or CPU selectable; optional retraining with your own, locally available contours (MyTrain).
Drag nodes, move the contour, insert/delete points, snap to contrast edges, point-by-point and freehand drawing with automatic ring closure, scaling, two smoothing methods, mask view.
Resampling onto the T2 grid without filter/interpolation; ADC as a weighted log-linear fit; IVIM-DKI with ≥ 3 high and ≥ 2 low b-values (otherwise the reason is stated); eADC, cDWI; automatic position correction with manual fine adjustment. Optional: noise-floor correction of the measured b-images before the ADC fit – it removes the systematic ADC underestimation near the noise floor; scanner-computed b-values remain uncorrected. The diffusion image can be denoised for display only.
Lesion detection only inside the contour; bpMRI score 2–5 relative to the respective examination; colour = score, only 4 and 5 visible (2 and 3 are discarded); rank by colour, then size; volume as an ellipsoid from three T2 planes; circle switchable; lesions individually selectable – the report contains only the selected ones.
Real sag/cor T2 resampled isotropically (reformat as fallback), coupled crosshair, zoom/pan, diffusion/ADC strip, pixel values in every image; opens fully built on the slice of the most important lesion.
The lesions of the report on a simulated transrectal ultrasound image – guide an end-fire or side-fire probe with the mouse, vendor list with typical needle-guide angles, fictitious biopsy guide with virtual biopsy (2 cm core cylinder evaluated against prostate and lesion), biopsy position supine / lithotomy / lateral with repositioning of the prostate, report data per lesion, full screen. Schematic: an orientation aid for cognitive fusion and for the patient consultation, not a navigation system – see Fusion biopsy.
At import: sequence quality, coordinate system, slice spacing, resolution, overlap; warnings are shown in the program and recorded in a dedicated analysis report.
Lesion report as Word: patient, volume, lesion table with justification, assessment, rotating 3D GIF with thirds legend; text fallback without Word; copy to the clipboard. Examination analysis as a separate report.
The lesion search was developed in dialogue: first it was defined radiologically what constitutes a lesion suspicious according to PI-RADS 2.1 – then, together with Claude Code, how this can be expressed in computable rules. Both are documented here.
The starting point is the PI-RADS 2.1 description of a clinically significant lesion with diffusion and ADC as the leading sequences:
None of these features is sufficient alone – only their simultaneous occurrence at the same spot makes an area suspicious. And: the rating is relative to the respective examination, not bound to absolute numbers, because scanners and protocols measure differently.
The report says where a lesion lies. The simulation shows how to reach it with the transrectal probe: it transfers the lesions found in the MRI into the geometry of the ultrasound, places a virtual probe at the prostate and displays the section as it will appear on the machine – with needle guide, target values per lesion and selectable patient position. The simulation runs in the browser. Every urologist can thus check beforehand whether the lesion found in the MRI can be reached at all with their own machine – and show it to the patient.
The MRI is acquired supine, the biopsy is done in lithotomy or lateral position – and the probe pressure deforms the gland. The simulation reproduces this change of position: for supine (MRI position), lithotomy, left and right lateral position or custom values the prostate is repositioned rigidly about its centre relative to the probe – tilt of the base ventrally, lateral tilt, lateral shift and anterior-posterior compression. Probe position, sections, table and target values follow the selected position.
| Position | Tilt | lateral | Compression |
|---|---|---|---|
| Supine (MRI) | 0° | 0 mm | 0 % |
| Lithotomy | 10° | 0 mm | 10 % |
| Left / right lateral | 8° | 3 mm towards the table side | 8 % |
The presets are typical approximations from the literature on MR/TRUS fusion (shifts of a few millimetres, rotations of about 5–15 degrees, compression of about 10 %) – not a patient measurement, all values can be adjusted. This makes the effect of positioning on the position of the prostate visible instead of silently ignoring it.
The simulation runs entirely in the browser. An example with synthetic test data – three fictitious lesions in a schematic prostate, no patient reference – can be opened right here:
Start the fusion biopsy simulation
Opens in a new tab (Chrome, Edge or Firefox). The probe is handled the same way in both images: slide along its axis, rotate across it. From the application the same simulation starts with the lesions of the current report.
Schematic: probe position estimated from the contour, no tissue deformation, no image registration – an orientation aid for cognitive fusion, not a navigation system.
How: The prostate is not deformed but moved as a whole relative to the probe – a rigid transformation about the prostate centre: first the anterior-posterior compression as a squeeze along the AP axis, then the tilt about the left-right axis (base ventrally), the lateral tilt about the AP axis and finally the lateral shift. The same mapping applies to all geometries: the slice contours of the 3D stack, the lesion volumes and the prostate surface, which is built for this purpose from 72 rays per slice plus elliptical caps into a closed triangle mesh. Then the probe is re-applied: its axis lies again so that the probe surface touches the most dorsal contour; insertion depth, apex reference, midline and all target values are recomputed, the targeting of the selected lesion is renewed. The ultrasound image is then the exact section of the scan plane with these meshes – for every plane, even through the tilted gland.
Why: A patient-specific measurement of the change of position is not possible from the MRI, and the simulation does not register images. A rigid approximation with literature values is honest, comprehensible and adjustable in seconds. Because the probe is always placed against the gland, distances and needle paths remain consistent; because everything is a mesh, there are no special cases for axial or sagittal sections.
How: Diffusion and T2 are brought into a common world coordinate system via the DICOM geometry (image position and image orientation of every slice). Every T2 voxel takes exactly one native diffusion voxel for all b-values – nearest neighbour, no interpolation, no filter. Through the slices the real position of every diffusion slice counts; if the assigned slice lies more than 1.5 mm from the T2 slice, this is noted in the image. In-plane the program corrects the patient motion between the acquisitions automatically: per diffusion slice a pixel shift is estimated from the series with the lowest b-value (T2-like contrast) by phase correlation in a window around the projected prostate and applied to all b-values – only with sufficiently reliable correlation and plausible size. Manual corrections always take precedence; the analysis report documents every correction.
Why: The motion between T2 and diffusion acquisition is in no DICOM header, and diffusion images are geometrically distorted – without alignment lesions end up next to the contour. Nearest neighbour instead of interpolation, because any mixing of neighbouring voxels systematically raises the ADC of small lesions and the fit would no longer compute in the native grid. Doing without filters keeps the displayed values raw and comparable to the scanner ADC.
Both editions compute identically – same AI, same lesion analysis, same reports. They differ in data handling – and the test edition is limited to 30 PIRADS computations.
| Feature | Full edition | OPEN (test edition) |
|---|---|---|
| Loading | data management (holdings, saved patients, backup) and drag & drop | folder chooser or drag & drop (folder or ZIP) |
| Several examinations in a folder | selection by patient name and study date – exactly one is loaded | no selection – the most recent one is loaded without asking |
| Storage | permanent (contours, masks, lesion/ADC results, saved series) | none – all working folders are deleted at program end, before the next drop and at start |
| Remembering patients | yes, last examination on start | no – nothing is remembered |
| Restore a backup | yes | no |
| Log (diagnostics) | continuous log file | session log, started afresh at every start |
| PIRADS computations | unlimited | 30 computations – the counter goes down by one after every computation (start screen and status line); at zero a notice instead of a computation |
| AI, lesion analysis, reports, simulation, help | identical | |
| Licence | licence agreement (version series 1.x) – for partners in further development and new projects | free of charge – terms of use of the test edition, trial only |
The full edition is licensed exclusively to entrepreneurs, practices, hospitals, research and educational institutions: one workstation per licence, version series 1.x, no passing on, no reverse engineering, no circumvention of technical protection measures. The software is not a medical device; every output must be verified on the licensee's own responsibility. Provided “as is”, liability for slight negligence excluded, indemnification against third-party claims, Austrian law. The OPEN test edition is subject to short terms of use. The installer shows the respective text and requires acceptance; the texts accompany every installation. Full text of the licence agreement and terms of use.
The test edition comes as the self-extracting file Prostate_Commander_Open.exe or as the ZIP package Prostate_Commander_open.zip. The installer is bilingual (German/English), only asks for the target folder (default C:\Prostate Commander, freely selectable) and writes exclusively there: no registry entries, no environment variables, no services. Shortcuts on the desktop or in the Start Menu are optional and plain files. No patient data is shipped. The test edition is limited to 30 PIRADS computations.
The AI needs a Python environment with torch and monai. On request the installer creates it inside the installation folder – with an existing Python or with the embedded Python from python.org, likewise only in the installation folder. Without this option everything except AI contouring works; contours can then be drawn by hand.
Prostate Commander is also an experiment: a pilot project to explore how powerful hybrid software development has become – expertise and decisions from the human, implementation, tests and documentation together with the AI programming assistant Claude Code. The result: massive savings in time, resources and cost.
The radiologist describes what is needed clinically – from the PI-RADS criteria to the needle guide of the fusion biopsy –, checks every proposal on the image and corrects. The AI translates this into code, writes tests, help and changelog, keeps both program variants in sync and justifies every decision.
Time, staff and cost that such a tool classically devours – requirements document, development team, coordination rounds – shrink to days and a two-digit euro amount. The effort shifts to where it belongs: to the professional specification.
If a professional with a clear idea can bring such an application into being within a week, this changes how clinical tools are created: faster, closer to the need, adaptable at any time. The caveat remains: a research tool, not a medical device – it does not replace medical judgement. That is why we are looking for partners – for the further development of Prostate Commander and for new projects along the same path.
Stand-alone Windows application (no separate Python required), completely offline. A CUDA graphics card is used automatically for the AI, otherwise CPU-optimised.
Image data never leave the computer. No cloud, no telemetry. Processes DICOM – the international standard for medical image data. Installation and package contain no patient data.
Written in Python, in direct collaboration between a human and the AI programming assistant “Claude Code” by Anthropic – the lesion logic too was derived from the PI-RADS criteria this way and translated into code. One week to the current state, € 80 in AI licences – see Pilot project.
The AI segmentation uses the model weights “Models for Prostate158” by Keno Bressem (Charité – Universitätsmedizin Berlin), doi:10.5281/zenodo.6397057, licence CC BY 4.0. They are downloaded at the first AI call and are not part of the licence agreement. Reference: Adams LC, Makowski MR, Engel G et al. Prostate158 – An expert-annotated 3T MRI dataset and algorithm for prostate cancer detection. Comput Biol Med 2022;148:105817. All other third-party components with licence texts are listed in the file Drittanbieter-Lizenzen.txt of every installation.
Deliberately without contrast-enhanced sequences: shortened biparametric protocols are imminent; the lesion search is designed for T2, diffusion and ADC.
Program, help, reports and installer in German and English, each switchable.
Every session logs import, sequence search and computation to a log file – if questions arise, the problem can be traced.
No. It is a research and development tool without CE marking. It provides verifiable proposals and justifications but does not replace medical judgement.
Yes – especially for that. The 3D rendering of the patient's own prostate with the lesions, the three image planes and the fusion biopsy simulation show the patient where the problem is and how the diagnostic biopsy is performed. The consultation itself remains a medical task; see Urology & patient consultation.
An axial T2 series is mandatory. For the lesion search diffusion series with at least two b-values are needed; sagittal and coronal T2 improve the multiplanar view and the volume measurement (if missing, the axial series is reformatted). Contrast-enhanced sequences are not used.
No. Dragging a folder or ZIP into the window is enough – all required series are recognised from the DICOM headers, vendor-independently. If a folder holds several examinations, the full edition offers a choice; OPEN loads the most recent one.
No. The application works completely offline; there is no cloud connection and no telemetry. The website too uses no cookies and no tracking.
Every lesion receives a bpMRI score 2–5 from DWI height (40 %), ADC core (35 %) and T2 hypointensity (25 %), each measured against the prostate of the same examination. This cancels out scanner and protocol differences. Score 5 additionally requires ≥ 15 mm in one plane or capsular breach. Only score 4 and 5 are displayed and assessed; lesions with score 2 and 3 are discarded.
Yes. Contours created or corrected by hand are saved with a corresponding label and can flow into the model locally with the included training module (MyTrain).
A standard Windows PC. An NVIDIA graphics card (CUDA) speeds up AI segmentation considerably but is not a prerequisite – without a GPU the application computes CPU-optimised.
Yes – directly in the browser with synthetic test data: start the simulation. In the application the same simulation opens with the lesions of the current report.
Yes. Under “biopsy position” you choose supine (MRI position), lithotomy or left/right lateral position; the prostate is tilted, shifted and compressed relative to the probe, table and target values follow. The presets are typical literature values, not a patient measurement, and can be adjusted.
No. The installer writes exclusively into the chosen folder – no registry entries, no environment variables, no services. Shortcuts are optional and plain files; to remove the program, deleting the folder is enough.
Via the contact form with the topic “Test edition (OPEN)”. The OPEN edition stores nothing beyond the session, remembers no patients and is limited to 30 PIRADS computations – the counter goes down with every computation.
The counter on the start screen is at zero, the test edition shows a notice and computes no more; loading, contouring and AI segmentation remain available. The full edition without limit and with data management is available to partners who contribute to further development or to new projects – contact via the contact form.
For questions, the test edition, cooperation requests or professional exchange please use the form. The message is delivered directly via the web server of this site – without any third-party form service. Should delivery via the server be unavailable, your mail program opens with the prepared message.
Test edition OPEN: 30 PIRADS computations. Partners wanted: for the further development of Prostate Commander and for new projects – hybrid software development has shown its potential. Partners receive the full edition (entrepreneurs, practices, institutions).